Child Safety Seats
Guidelines for Seating Children
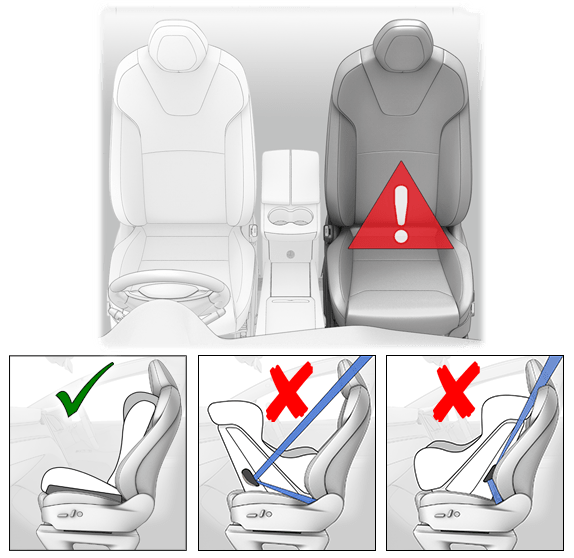
You must restrain infants and small children using a child safety seat appropriate for the child’s age, weight, and size. In market regions where seating a child on the front passenger seat is legally permitted, you must never seat a child on the front passenger seat when the associated airbag is enabled (see Airbags), even if the child is seated in a child safety seat or a booster seat. DEATH or SERIOUS INJURY to the child can occur.
Refer to the following label fitted to the sun visors.

The status of the passenger front airbag displays in the top corner of the touchscreen:


For details on how the passenger front airbag is controlled, see Airbags.
Suitability and Fitting of Child Restraint Systems
All Model X seat belts are designed for adults. When seating infants and children, you must:
- Use a child restraint system appropriate for the child’s age, weight, or size (see Recommended Child Restraint Systems).
- Use a child restraint system that is appropriate for the specific seating position in Model X. For details on what type of child restraint system can be used in each passenger seat, see Front Passenger Seat, Second Row Outboard Seats (Bench Seats) or Second Row Outboard Seats (Monopost Seats), Second Row Center Seat (Bench or Monopost), and Third Row Seats.
- Properly install the child restraint system by following the manufacturer's instructions (see Installing Belt-based Child Restraint Systems and Installing ISOFIX Child Restraint Systems for general guidelines).
Recommended Child Restraint Systems
Although all weight groups can occupy any passenger seat in Model X, the type of child restraint system that can be used in each seat can vary. For example, only belt-based child restraint systems (as defined in Two Installation Methods) can be used in the rear center seat.
Choose a child restraint system that meets one of: FMVSS 213, ECE R44, ECE R129, or AS/NZS 1754. For more information about child seats, go to www.govt.nz/browse/transport/car-seats-for-kids/.
In the table below, Tesla provides recommended child restraint systems based a child's weight group (as defined in ECE R44 “Uniform Provisions Concerning Restraining Devices for Child Occupants"). Although all weight groups can occupy any passenger seat in Model X, the type of child restraint system that can be used in each seat can vary. For example, only belt-based child restraint systems (as defined in Two Installation Methods) can be used in the rear center passenger seat.
| Stature* | Weight Group** | Child Weight | Tesla Recommended |
|---|---|---|---|
|
- |
Group 0+ |
Up to 13 kg |
Maxi-Cosi CabrioFix with |
|
45-105 cm |
- |
- |
Maxi-Cosi Pearl 360 with Familyfix 360 |
|
- |
Group I |
9 to 18 kg |
Britax Römer DUO PLUS |
|
- |
Group II |
15 to 25 kg |
Britax Römer KIDFIX2 R |
|
100-150 cm |
- |
- |
Britax Römer KIDFIX I-Size |
|
- |
Group III |
22 to 36 kg |
Britax KIDFIX2 R, Peg Perego Viaggio 2-3 Shuttle base |
|
* per R129 CRS maker's rating |
|||
- Do not use a child restraint system that is more than 10 years old.
- Confirm that the child restraint system was not being used in a vehicle that was involved in a collision.
- Ensure that all components (buckles, etc.) of the child restraint system operate smoothly and there are no signs of wear or damage (splits, cracks etc.).
- Ensure the harnesses on the child restraint system are not frayed, worn or damaged
- Ensure the child restraint system has an instruction manual.
Seating Larger Children
If a child is too large to fit into a child restraint system, but too small to be safely secured using the vehicle's seat belts, use a booster seat appropriate for the child’s age and size. For children needing a booster seat, Tesla recommends using the base of the Peg Perego Viaggio 2-3 Shuttle. When using and installing a booster seat, carefully follow the instructions provided by the manufacturer.
Two Installation Methods
Among many other variants, there are two general types of child restraint systems based on how they are secured in the seat:
- Belt-based - secured using the vehicle’s seat belts (see Installing Belt-based Child Restraint Systems).
- ISOFIX/i-Size - secured to anchor bars built into the vehicle's seats (see Installing ISOFIX Child Restraint Systems).
Some child restraint systems can be installed using either method. Refer to the instructions provided by the manufacturer of the child restraint system for detailed installation instructions.
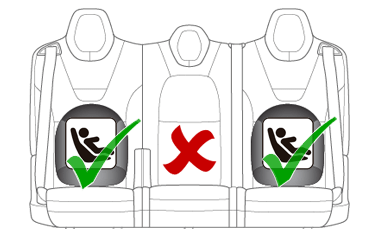
In Model X, belt-based child restraints can be installed in any rear passenger seat and ISOFIX/i-Size systems can be installed in either of the second row outboard seats. Specific details about the type of child restraint system that can be used in each seat is provided next.
Front Passenger Seat
-
Second Row Outboard Seats (Bench Seats)

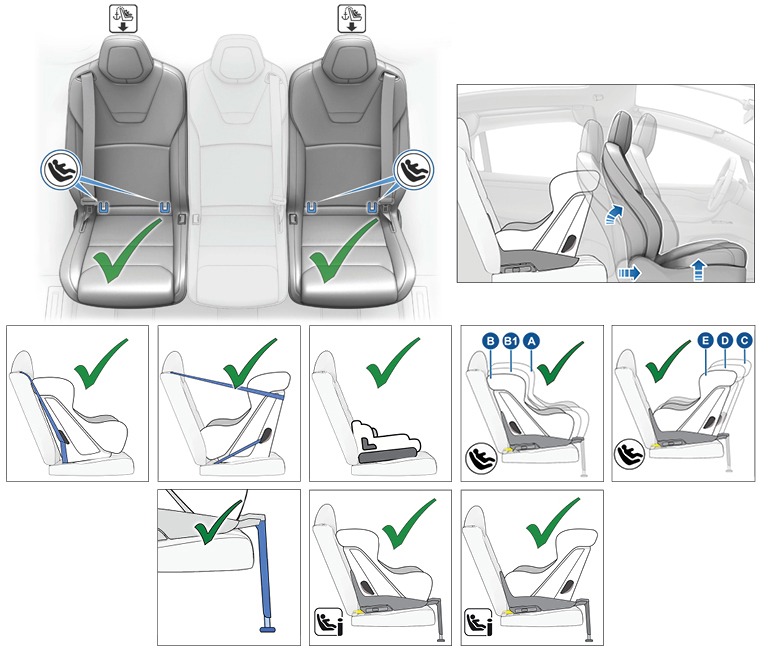
Infants and children can occupy a second row outboard seat using either belt-based, or ISOFIX (IU), or i-Size (i-U) child restraint systems. The second row outboard seats support the use of the following ISOFIX size classes:
- Size class A*, B, and B1 forward-facing.
- Size class C*, D and E rear-facing.
- Also compatible with AS/NZS 1754 child restraint systems Type A, A2, A4, B, D, E, and F.
Larger children can also occupy a rear outboard seat using a Type B2 booster seat, attached as described in the instructions provided by the child restraint system manufacturer.
Second Row Outboard Seats (Monopost Seats)
Infants and children can occupy a second row outboard seat using either belt-based or ISOFIX child restraint systems. You can use forward-facing and rear-facing belt-based, ISOFIX, or i-Size (I-U) child restraint systems in a second row outboard seat. The second row outboard seats support the use of the following ISOFIX size classes:
- Size class A*, B, and B1 forward-facing.
- Size class C*, D and E rear-facing.
- Also compatible with AS/NZS 1754 child restraint systems Type A, A2, A4, B, D, E, and F.
Larger children can also occupy a second row outboard seat using a Type B2 or B3 booster seat, attached as described in the instructions provided by the child restraint system manufacturer.
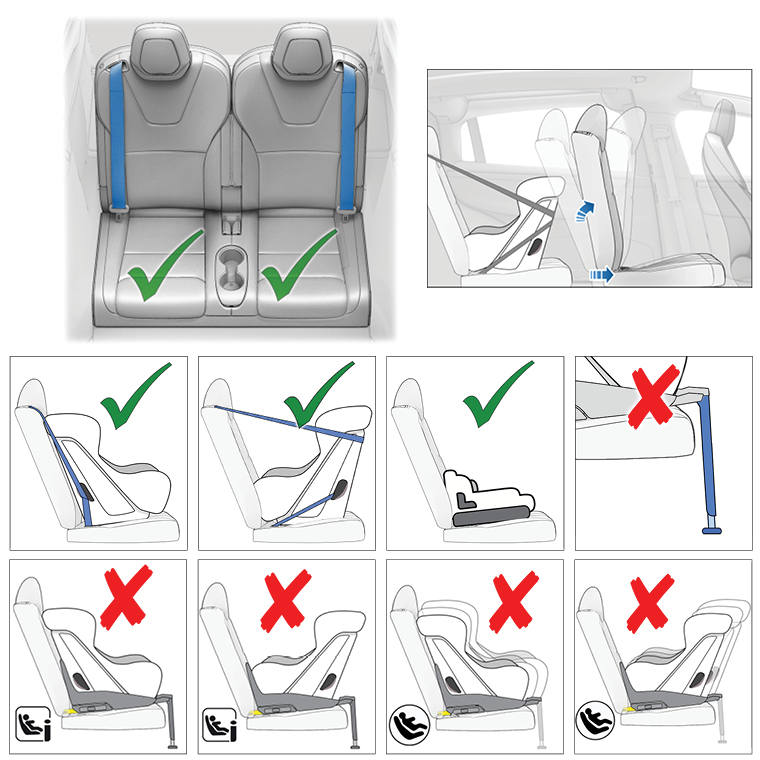
Second Row Center Seat (Bench or Monopost)

Infants can occupy the rear center seat using a rear-facing belt-based child restraint system. Children can occupy the rear center seat using either a rear-facing or a forward-facing belt-based child restraint system..
Compatible with AS/NZS 1754 child restraint systems Type A, A2, A4, B, D, E, and F.
Larger children can occupy the second row center seat using a Type B2 or B3 booster seat, attached as described in the instructions provided by the child restraint system manufacturer.
Third Row Seats
Infants and children can occupy a third row seat using a belt-based child restraint system.
Compatible with AS/NZS 1754 child restraint systems Type A, A2, A4, B, D, E, and F.
Larger children can also occupy a third row seat using a Type B2 booster attached as described in the instructions provided by the child restraint system manufacturer.
Installing Belt-based Child Restraint Systems
Always follow the detailed instructions provided by the manufacturer of the child restraint system. Follow these general guidelines for belt-based child restraint systems:
- Ensure that the child restraint system is appropriate for the weight, height, and age of the child.
- Avoid dressing the child in bulky clothing.
- Do not place any objects between the child and the child restraint system.
- Adjust the child restraint system's harnesses for every child, every trip.
- Place the child restraint system in the appropriate seat and fully extend the seat belt. Route and buckle the seat belt in accordance with the instructions provided by the manufacturer of the child restraint system.

- Allow the seat belt to retract, and remove all slack in the seat belt while firmly pushing the child restraint system into the vehicle's seat.
- Attach the upper tether strap(s), as required by the manufacturer of the child restraint system (see Attaching Upper Tether Straps).
Installing ISOFIX Child Restraint Systems
Second row outboard seating positions are equipped with ISOFIX/i-Size anchor bars. These anchor bars are located between the seat's cushion and back rest. The exact location of each anchor bar is identified by a marking (illustrated below) located on the seat back, directly above its associated anchor bars.
Monopost Seats:

In the second row, install ISOFIX child safety seats in the outboard seating positions only. Use only a seat belt retained seat in the center position.

Bench Seats:

In the second row, install ISOFIX child safety seats in the outboard seating positions only. Use only a seat belt retained seat in the center position.
To install an ISOFIX/i-Size child restraint system, carefully read and follow the instructions provided by the manufacturer of the child restraint system. These instructions describe how to slide the child restraint system onto the seat’s anchor bars until you hear it "click" into place. You may need to push the child restraint system firmly against the seat back to ensure it fits snugly.

Adjust until the child restraint system is fitted firmly against the seat back. Ensure the child restraint system fits snugly.

Before seating a child, ensure that the child restraint system is securely installed. Grasp the front of the child restraint system with one hand on each side, and attempt to:
- Twist the child restraint system from side to side.
- Pull the child restraint system away from the seat.
If the child restraint system moves away from the seat, both latches are not fully engaged onto the seat's anchor bars. You must reinstall it and try again. It is critical that both latches on the child restraint system are fully engaged.
Safety Leg
First and second row passenger seats in Model X support the use of a child restraint system with a safety leg. If the child restraint system is equipped with a leg, extend the leg as described in the instructions provided by the manufacturer of the child restraint system.

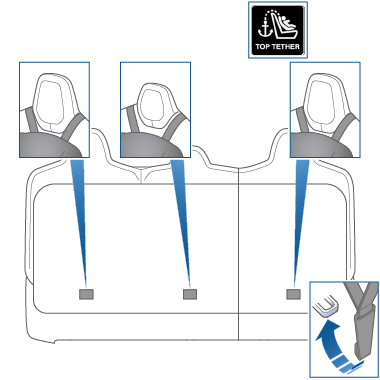
Attaching Upper Tether Straps
Second and third row seats support the use of upper tether straps. When the instructions provided by the manufacturer of the child restraint system include attaching an upper tether strap, attach its hook to the anchor point located behind the associated seat.
The anchor points for tether straps are located on the back of the second and third row seats.
For dual-strap tethers, position a strap on each side of the head restraint.

Dual Straps - Second Row Monopost Seats:

Dual Straps - Second Row Bench Seats:
Dual Straps - Third Row Seats

Single Strap - Second Row Monopost Seats:
For single-strap tethers, position the strap in the outboard seating positions over the outside-facing side of the head restraint (in other words, on the same side of the head restraint as the seat belt retraction mechanism). In the center seating position (if equipped), center and position the strap over the top of the head restraint.

Single Strap - Second Row Bench Seats:
For single-strap tethers, position the strap in the outboard seating positions over the outside-facing side of the head restraint (in other words, on the same side of the head restraint as the seat belt retraction mechanism). In the center seating position (if equipped), center and position the strap over the top of the head restraint.

Single Strap - Third Row Seats
For single-strap tethers, position the strap over the outside-facing side of the head restraint (in other words, on the same side of the head restraint as the seat belt retraction mechanism).
Technical Information
ECE 16-07 Annex 17, Appendix 3, Table 1
| Seat Position Number (see below) | |||||||
|---|---|---|---|---|---|---|---|
|
1 and 3 |
1 and 3 |
4 | 5 | 6 | 7 | 9 | |
| Weight Groups Allowed | 0, 0+, I, II, III | No | 0, 0+, I, II, III | 0, 0+, I, II, III | 0, 0+, I, II, III | 0, 0+, I, II, III | 0, 0+, I, II, III |
| Suitable for universal belted? | Yes (*1) | No | Yes | Yes | Yes | Yes (*3) | Yes (*3) |
| Suitable for i-Size? | No | No | Yes | No | Yes | No | No |
| Suitable for lateral (L1/L2)? | No | No | L1 (*2) | No | No | No | No |
| Largest suitable rear-facing ISOFIX (R1/R2X/R2/R3). | No | No | R3 (*2) | No | R3 (*2) | No (*4) | No (*4) |
| Largest suitable forward-facing ISOFIX (F1/F2X/F2/F3). | No | No | F3 (Size Class A) | No | F3 (Size Class A) | No (*4) | No (*4) |
| Largest suitable booster seat (B2/B3). | B3 | No | B3 (*5) | B3 (*5) | B3 (*5) | B2 | B2 |
| Suitable for safety leg? | Yes | No | Yes | Yes | Yes | No | No |
| *NOTES: 1. To accommodate a seat belt-retained Child Restraint System in the front seat, adjust the seat upward to the mid-height position. Adult safety belt buckles are not located laterally between ISOFIX anchor bars in any given seat. |
|||||||
Summary of Seat Position Numbers
| Seat Position | Location in Vehicle |
|---|---|
| 1 | Front Left (RHD vehicles only) |
| 3 | Front Right (LHD vehicles only) |
| 4 | Second Row Left |
| 5 | Second Row Center |
| 6 | Second Row Right |
| 7 | Third Row Left (Optional) |
| 9 | Third Row Right (Optional) |
Child Restraint System Warnings
A passenger less than six months old must be restrained in a suitable and properly fastened and adjusted rear-facing approved child restraint system. A passenger six months or older, but less than four years old, must be restrained in a suitable and properly fastened and adjusted:
- rear-facing approved child restraint system; or,
- forward-facing approved child restraint system equipped with a built-in harness.
Infants and small children should ride in a rear-facing child restraint system as long as possible, until they exceed the maximum weight or height permitted by rear-facing child restraint systems.