Towing and Accessories
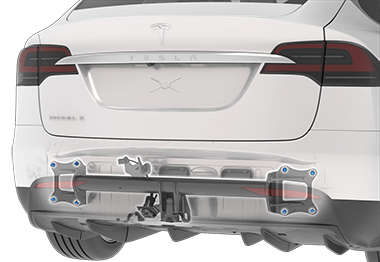
The towing package allows you to tow a trailer with your Model X. It also allows you to carry skis, snowboards, bicycles, etc. by attaching an accessory carrier to the hitch.
Carrying Accessories
The Model X towing package has a 2 inch hitch receiver that can support an accessory carrier.
The hitch receiver is designed to support vertical loads of up to 54 kg when the load is cantilevered rearward within 63 cm of the hitch receiver, such as when carrying bikes on an accessory rack.
When carrying bicycles or other items on the Model X hitch, always check to ensure that the maximum weight is not exceeded. When calculating weight, remember to include the weight of the accessory carrier. For example, assuming the carrier weighs 14 kg, the weight threshold is sufficient for carrying two bicycles weighing approximately 20 kg each, or four bicycles weighing approximately 10 kg each.
To install and use an accessory carrier, the tow hitch must be connected (see Connecting the Tow Hitch). Then follow the instructions provided with your accessory carrier. Observe all regulations and legal requirements in your state/region that apply to carrying accessories.
The Model X towing package includes the wiring necessary for using an accessory carrier equipped with lights (see Electrical Connections). The package also includes Trailer Mode software (see Trailer Mode).
When carrying accessories, periodically confirm that the accessory carrier and its cargo remain secure at all times, and if applicable, that the lights on the accessory carrier are working.
Towing Capacity
The total trailer weight (including all cargo and additional equipment), and the trailer tongue weight, must never exceed the following:
| Wheel/Rim Size | Maximum Towing Capacity* | Maximum Tongue Weight** |
|---|---|---|
| 20" | 2270 kg | 227 kg |
| 22" | 1580 kg | 158 kg |
*Tesla recommends a separate braking system on trailers with a loaded weight of over 450 kg. The braking system must be appropriate for the weight of the trailer. Follow the instructions provided by the trailer brake manufacturer to ensure that trailer brakes are properly installed, adjusted, and maintained.
**The tongue weight is the downward force that the weight of the trailer exerts on the hitch. It must not be less than 4% of the trailer load. Carrying a significant amount of equipment, passengers, or cargo in the tow vehicle can reduce the tongue weight it can handle, which also reduces the maximum towing capacity. Maximum towing capacity is calculated assuming the GVWR (Gross Vehicle Weight Rating) is not exceeded. The GVWR is printed on the Safety Certification Label (see Safety Certification Label).
Tire Pressures when Towing
When towing a trailer, tire pressures must be adjusted to accommodate the additional load. Keep tires inflated to the pressures shown below (these pressures override the pressures that are provided on the Tire and Loading information label):
| Front Tires | Rear Tires | Cold Tire Inflation Pressure |
|---|---|---|
|
255/45R20 265/45R20 |
275/45R20 |
46 psi (320 kPa) |
|
265/35ZR22 |
285/35ZR22 |
50 psi (345 kPa) |
Before Towing a Trailer
Before towing a trailer, you must do the following:
- Inflate tires to the cold tire inflation pressure specified in Tire Pressures when Towing.
- Set the Suspension height to Low (touch ).
- Observe all regulations and legal requirements in your state/region that apply to trailer towing. Failure to comply with regulations can compromise your safety.
- Adjust side mirrors to provide a clear rearward view without a significant blind spot.
- Engage Trailer Mode (see Trailer Mode).
Confirm the following:
- Model X rests horizontally with the trailer attached. If the vehicle is tipped up at the front, and down at the rear, check that you are not exceeding the maximum towing capacity and tongue loads provided in Carrying Capacity.
- All trailer hitch parts and attachments , safety chains, and electrical connectors (including reverse and fog lights, if equipped) are in good condition and are properly connected. If any problems are apparent, do not tow the trailer.
- Trailer lights (brake lights, turn signal lights, and marker lights) are working properly.
- The trailer tongue is securely connected to the hitch ball.
- All cargo is secured.
- Wheel chocks are available.
- The trailer load is evenly distributed such that the trailer tongue weight is approximately 4% of the total trailer weight, without exceeding the maximum tongue weights provided in Carrying Capacity.
- If the trailer is equipped with a separate braking system, check that the brakes work and are properly adjusted. To provide safe stopping ability, you must balance the trailer brakes with the vehicle brakes.
Trailer Mode
Trailer Mode must always be active when towing a trailer. When you connect a trailer's electrical connection, Model X automatically engages Trailer Mode. When you disconnect the trailer's electrical connection, Trailer Mode disengages. To engage or exit Trailer Mode manually, touch on the touchscreen. One of the following indicators display on the instrument panel:
Some Autopilot features, as well as rear parking sensor functionality, may not be available when Trailer Mode is enabled. In addition, some features may operate differently. For example:
- Autosteer is unavailable.
- For Traffic-Aware Cruise Control availability, first set . Then, engage Traffic-Aware Cruise Control with a single press of the right steering yoke scroll button.
- Traffic-Aware Cruise Control increases the following distance from the car in front of you.
- The air suspension system will not make speed-based adjustments from Medium to Low.
- The air suspension system does not automatically raise ride height based on saved locations.
- Side collision warnings are active but automatic steering interventions are disabled.
- The braking force provided by Automatic Emergency Braking (see Collision Avoidance Assist) is significantly limited.
Trailer Brakes
When towing a loaded trailer that weighs more than 450 kg, Tesla recommends that the trailer be equipped with its own brake system adequate for the weight of the trailer. Ensure compliance with local regulations. A brake controller must be purchased separately, and the required 4-pin pigtail connector can be ordered from Tesla Service.
Follow these steps to connect a brake controller:
- Connect the wiring on the brake controller to the appropriate locations on the 4-pin pigtail connector.
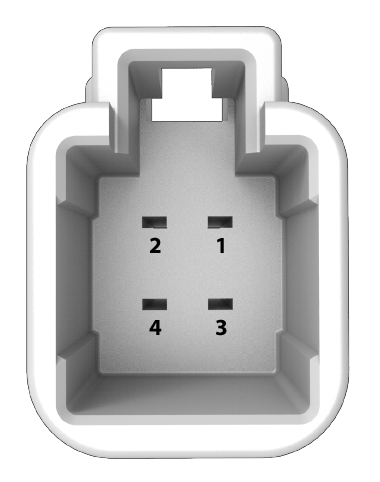
1 - Brake control output to trailer
2 - Ground
3 - Brake On Signal
4 - Low Voltage Power (20A)
- Remove the cover located under the dashboard in the driver's side foot well.

- Peel back the carpet to expose Model X's 4-pin connector on the wiring harness.

- Connect the pigtail connector to the vehicle wiring connector.
Towing Guidelines
Model X is designed primarily as a passenger-carrying vehicle. Towing a trailer puts additional load on the motor(s), drive train, brakes, tires, and suspension and significantly decreases range. If you decide to tow a trailer, proceed with caution and follow these general guidelines:
- Reduce your driving speed and avoid sudden maneuvers. Keep in mind that when towing a trailer, steering, stability, turning radius, stopping distance and braking performance are different when compared to driving without a trailer.
- Increase your following distance by maintaining at least twice the distance from a vehicle ahead. This helps to avoid situations that require heavy braking. Sudden braking may result in skidding or jack-knifing, and loss of control.
- Avoid sharp turns. Sharp turns can cause the trailer to contact the vehicle and cause damage. Keep in mind that the trailer wheels are closer to the inside of the turn than the vehicle’s wheels. Therefore, make wider turns to prevent the trailer from hitting curbs, road signs, trees or other objects.
- Periodically check the trailer lights and turn signals to confirm that bulbs are still working. When towing a trailer, the turn signal arrows on the vehicle instrument cluster flash as normal, even if the bulbs on the trailer are burned out.
- Periodically confirm the cargo is secure.
- Periodically confirm the trailer brakes are working.
- Avoid parking on a grade (see Parking with a Trailer).
- Regularly confirm that all towing components are securely tightened.
Parking with a Trailer
Whenever possible, avoid parking on a grade. However, if parking on a grade is absolutely necessary, place wheel chocks under the trailer wheels:
- One person presses and holds the brake pedal.
- A second person places the wheel chocks under the wheels on the downgrade side of the vehicle's tires.
- When the chocks are in place, release the brake pedal and ensure the chocks hold the weight of the vehicle and trailer.NoteWhen testing chocks, ensure that Vehicle Hold (see Vehicle Hold) is not engaged. If Vehicle Hold is braking Model X, the Vehicle Hold indicator light displays on the instrument panel. To disengage Vehicle Hold, press and release the brake pedal.
- Place the vehicle in Park.
Trailer Sway Mitigation
When trailer sway is detected, the Model X electronic stability control system attempts to apply the appropriate amount of braking to minimize trailer sway. The instrument panel briefly displays the traction control system indicator. Pressing the brake pedal when the system is actively braking to mitigate trailer sway does not cancel this automatic braking.
Connecting the Tow Hitch
The Model X towing package includes a weight-carrying hitch with a 2” x 2” removable hitch receiver. When not in use, the hitch receiver should be removed and stored in a dry location to prevent rust and corrosion. Keep the dust cover over the hitch housing to prevent dirt and debris from entering.
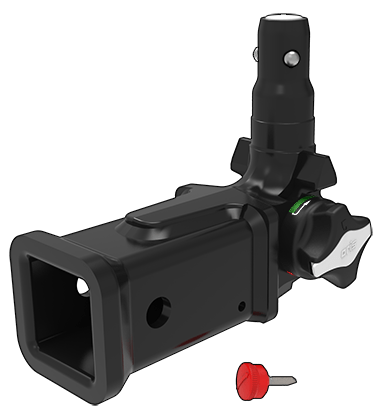
To install the trailer hitch receiver:
- Remove the dust cover from the hitch housing.
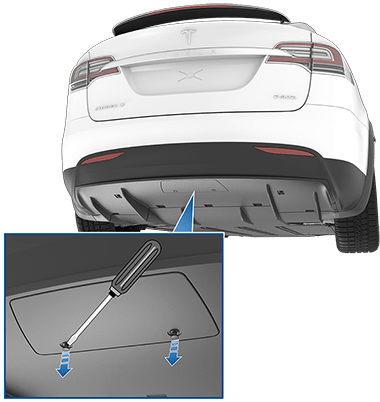
 NoteModel X may have two push clips that secure the dust cover to the vehicle. To open, use a sharp object, such as a flat screwdriver, to carefully pry the clips open. Remove the dust cover.
- Insert the key into the locking cylinder on the hitch, and turn the cylinder so the top of the key is aligned with the “unlocked” position.
- Pull the locking cylinder out of the adapter approximately 0.5 cm, and turn clockwise until the red marking on the cylinder aligns with the white dot.
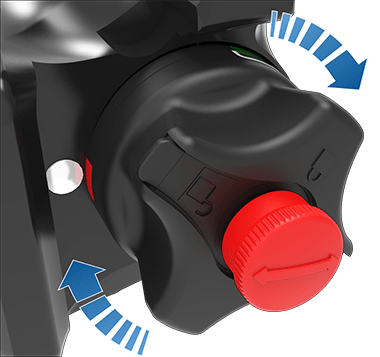 WarningBe careful when turning the locking cylinder. If it does not lock into the “Open Position”, it automatically retracts into its original “Closed Position” and can pinch your fingers.
 - Firmly grasp the hitch from the bottom and align the triangular-shaped guides at the sides of the hitch with the corresponding cutouts in the hitch housing. NoteDo not grasp the locking cylinder because it needs to rotate freely.
- Push the hitch into the hitch housing until the locking cylinder rotates approximately 120° counter-clockwise and automatically locks into the "Closed Position". The green area on the locking cylinder (above the white arrow) aligns with the white dot on the housing.
- Visually check to confirm that the hitch is fully inserted into the housing. Try pulling down on the hitch. The hitch should not drop when you pull down.NoteIf the hitch does not lock into the housing, it falls out when you pull down on it.
- Turn the key so the arrows align with the “locked” marking on the locking cylinder.
- Remove the key and store it in a safe place (preferably inside the vehicle).NoteThe key can be removed only if the hitch is locked. This indicates a proper connection. Do not use the hitch if the key is not removed.
- Close the dust cover to prevent dirt and debris from entering the lock. For newer version with push clips, reattach the dust cover, snap it in place and open the push clips before pushing them in.
Disconnecting the Tow Hitch
After towing, remove the hitch:
- Insert the key and turn to align the top of the key with the “unlocked” position.
- While firmly holding the bottom of the hitch (to prevent it from dropping to the ground), pull the locking cylinder out approximately 0.5 cm, and turn it clockwise until the red marking on the locking cylinder aligns with the white dot. At this point, the locking cylinder is locked in the "open" and the hitch drops out of the housing.WarningBe careful when turning the locking cylinder. If it does not lock into the “Open Position”, it automatically retracts into its original “closed" position and can pinch your fingers.
- Reinstall the dust cover on the hitch housing to prevent dirt from accumulating inside the housing.
- Close the dust cover on the hitch's locking cylinder and store the hitch in a secure location.
Attaching and Removing the Ball Mount
The Model X towing package does not include a ball mount. You must purchase a ball mount suitable for the type of trailer you are towing. The Model X hitch receiver supports a ball mount up to 8” with a rise of up to 0.75”. Do not use any type of drop ball mount.
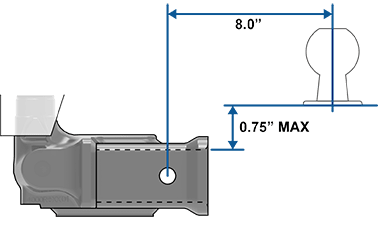
To attach a ball mount:
- If necessary, remove the cotter pin from the locking bolt and slide the locking bolt out of the hitch assembly.
- Slide the ball holder into the hitch assembly.
- Align the hole in the ball holder with the one in the hitch assembly.
- Slide the locking bolt through the hitch assembly/ball holder.
- Insert the cotter pin in the hole at the end of the locking bolt.
To remove a ball mount:
- Remove the cotter pin from the locking bolt and slide the locking bolt out of the ball holder/hitch assembly.
- Pull the ball holder out of the hitch assembly.
Electrical Connections
Regulations require all trailers to be equipped with tail lights, brake lights, side marker lights, and turn signals. To provide power for trailer lighting, a built-in seven-way wiring connector (SAE J560) is attached near the tow hitch. Most trailer wiring plugs can be attached to this connector.
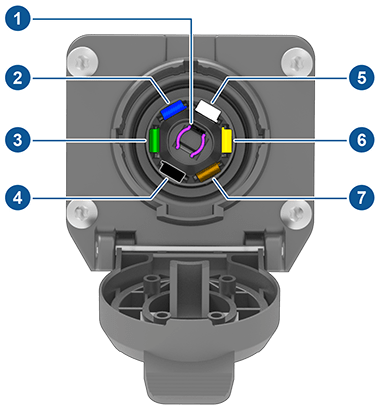
- Reverse Lights (Purple)
- Brake Controller Output (Blue)
- Right Turn Signal and Brake Light (Green)
- Low Voltage Power (Red or Black)
- Ground (White)
- Left Turn Signal and Brake Light (Yellow)
- Tail Lights and Running Lights (Brown)
Plugging trailer wiring into the Model X electrical connector automatically engages Trailer Mode (see Trailer Mode).
Impact on Range
Towing a trailer and carrying accessories increases vehicle weight and drag. As a result, driving range can decrease significantly. Although Trip Planner attempts to adjust estimates based on Trailer Mode, actual energy consumption may vary. Plan trip length and charging destinations accordingly.


