Cameras
Your Model X includes the following components that actively monitor the surrounding area:

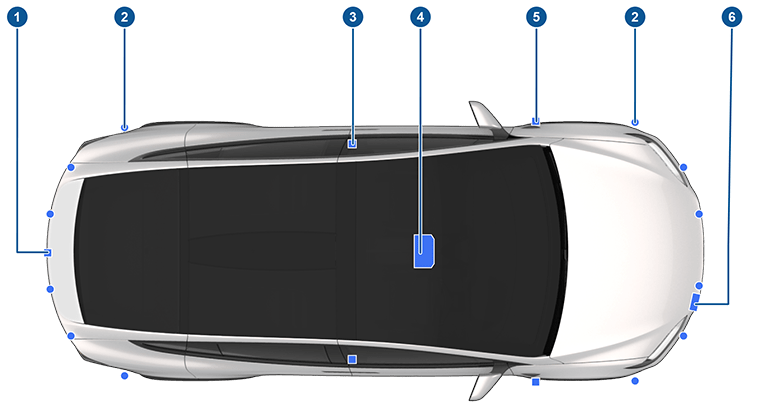
- A camera is mounted above the rear license plate.
- Ultrasonic sensors (if equipped) are located in the front and rear bumpers.
- A camera is mounted in each door pillar.
- Two cameras are mounted to the windshield above the rear view mirror.
- A camera is mounted to each front fender.
- Radar (if equipped) is mounted behind the front bumper.
Model X is also equipped with high precision electronically-assisted braking and steering systems.
Cabin Camera
Your Model X is equipped with a cabin camera located above the rear view mirror. For more information, see Cabin Camera.

Drive to Calibrate Cameras
Model X must maneuver with precision when Autopilot features are being used. Therefore, before some features such as Driver Drowsiness, Intelligent Speed Assist, Lane Departure Avoidance and Automatic Emergency Braking can be used for the first time or after some types of service repairs, cameras must complete a self-calibration process. For your convenience, the instrument panel displays a progress indicator.
When calibration is complete, Autopilot features, as well as Active Safety features, are available for use. Calibration typically completes after driving 20-25 miles (32-40 km), but the distance varies depending on road and environmental conditions. For example, calibration completes quicker when driving on a straight road with multiple lanes (such as a controlled-access highway), with highly-visible lane markings (in the driving lane as well as the adjacent lanes). Contact Tesla only if your Model X has not completed the calibration process after driving 100 miles (160 km) in the described conditions.
If a camera has shifted from its calibrated position (for example, the camera or windshield was replaced), you must clear the calibration. To do so, touch . When the calibration is cleared, Model X repeats the calibration process. While this helps re-calibrate the cameras in many cases, Clear Calibration may not resolve all camera and sensor concerns.
Keeping Cameras Free of Obstructions
Ensure all cameras are clean and free of obstructions before each drive and before using Autopilot features (see Cleaning a Camera). Dirty cameras and sensors (if equipped), as well as environmental conditions such as rain and faded lane markings, can affect Autopilot performance. If a camera is obstructed or blinded, Model X displays a message on the instrument cluster and Autopilot features may not be available.
Condensation can form inside the camera enclosures, especially if you park your vehicle outside in cold or wet conditions. The instrument cluster may display an alert stating that a camera is blocked and that some or all Autopilot features may be temporarily restricted until the camera vision is clear. To proactively dry the condensation, precondition the cabin by setting it to a warm temperature, turning the windshield defroster on, and directing the front air vents toward the door pillars (see Mobile App).