Front and Rear Seats

Correct Driving Position

The seat, head support, seat belt and airbags work together to maximize your safety. Using these correctly ensures greater protection.

Person sitting in the driver's seat, seat belt on, hands on steering wheel

Position the seat so you can wear the seat belt correctly, while being as far away from the front airbag as possible:

  1. Sit upright with both feet on the floor and the seat back in an upright position.
  2. Make sure you can easily reach the pedals and that your arms are slightly bent when holding the steering wheel. Your chest should be at least 10 inches (25 cm) from the center of the airbag cover.
  3. Place the shoulder section of the seat belt mid-way between your neck and your shoulder. Fit the lap section of the belt tightly across your hips, not across your stomach.

Model Y seats include integrated head supports in the front that cannot be adjusted or removed.

Adjusting the Front Seats
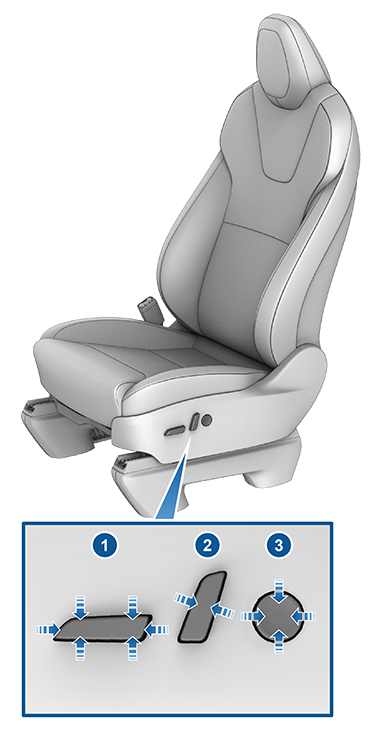
Three adjustment knobs on the side of the seat
  1. Move seat forward/backward and adjust the seat’s height and tilt angle up/down.
  2. Adjust backrest.
  3. Adjust lumbar support.
Warning IconA warning icon, calling your attention to a possibly risky situation
CAUTION
Do not move a front seat's backrest fully forward when the seat is also in the fully forward position. Doing so can cause the top of the seat to hit, and potentially damage, the sun visor.
Warning IconA warning icon, calling your attention to a possibly risky situation
Warning
Before adjusting a front seat, check that the area around the seat is free of obstacles (people and objects).
Warning IconA warning icon, calling your attention to a possibly risky situation
Warning
Do not adjust seats while driving. Doing so increases the risk of a collision.
Warning IconA warning icon, calling your attention to a possibly risky situation
Warning
Riding in a moving vehicle with the seat back reclined can result in serious injuries in a collision, as you could slide under the lap belt or be propelled into the seat belt. Ensure your seat back is reclined no more than 30 degrees when the vehicle is moving.

Calibrating Seats

You can calibrate the driver seat. This is useful if you find your seat range limited or your driver profile does not automatically adjust the seat for you. Navigate to Controls > Service > Driver Seat, Steering & Mirrors Calibration and follow the instructions on the touchscreen.
Warning IconA warning icon, calling your attention to a possibly risky situation
Warning
Ensure nothing is behind or underneath the driver seat during calibration. Failure to do so may cause serious injury.

Adjusting Second Row Seat Backs

Model Y provides seating for up to three passengers in the second row. The seat back is split 60/40 so adjusting the left seat back moves the seat backs for both the left and center seating positions, whereas adjusting the right seat back moves only the rightmost seat back.

For vehicles with 5 seats:

Use the adjustment handles on the outside corner of each second row outboard seat back to adjust the corresponding seat back. While pulling and holding the handle, move the seat back to the desired position, and then release the handle. Ensure the seat back is securely latched into position by pushing it forward and rearward.

Two arrows each pointing to a button on the outside of the second row seats

For vehicles with 7 seats:

Use the adjustment handles on the side shield of each outboard seating position to adjust the corresponding second row seat backs. While pulling and holding the handle, move the seat back to the desired position, and then release the handle. Ensure the seat back is securely latched into position by pushing it forward and rearward.

An arrow pointing to the handle on the outside of the second row seats. Another arrow on the seat back indicating forward/rearward

Folding Second Row Seat Backs

To maximize cargo space, each second row seat back can be folded fully forward to lay flat. While pulling and holding the handle, push the corresponding seat back fully forward.
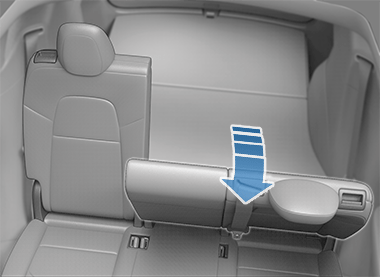
One second row seat folded forward with arrow pointing down
Informational PurposesAn informational icon, calling your attention
Note
Before folding seats fully forward, remove any items from the seats and the rear footwell. To allow the seat backs to fold completely flat, you may need to move the front seats forward.
Informational PurposesAn informational icon, calling your attention
Note
Driving with second row seats folded forward may increase perceivable noise and/or vibration coming from the rear of the vehicle (trunk, suspension, etc.).

To allow you to carry long items (such as skis) in the rear of Model Y, the center seat back can also be independently folded forward. Pull the handle on the rear of the seat back to unlatch it, then pull it forward.

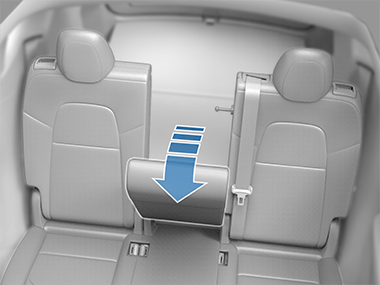
Blue handle on the back of the center seat
Center second row seat folded forward with arrow pointing down

You can also fold the second row seat backs fully forward by pressing the corresponding switch located on the left side of the rear trunk. Pressing the switch causes the seat back to swing forward. You can then push it downward so it lays fully flat.
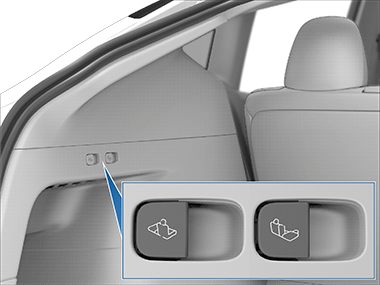
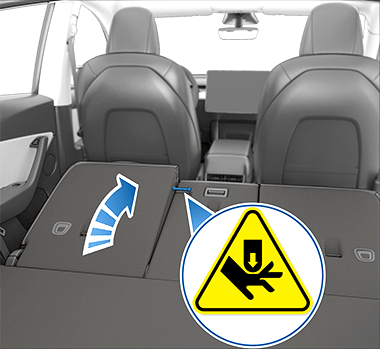
A callout showing a switch on the left side of the rear trunk
Warning IconA warning icon, calling your attention to a possibly risky situation
Warning
Before pressing the switch to fold the seat back, you MUST keep body parts (hands, fingers, etc.) and objects away from the edges of rear seats. The seat can swing forward with considerable force and cause injury or damage.

To return the seat backs to their upright position, pull it upwards until it locks into place. To confirm that the seat back is locked in the upright position, try pulling it forward.

Informational PurposesAn informational icon, calling your attention
Note
Before raising a second row seat back, make sure that the seat belts are not trapped behind the backrest.
Warning IconA warning icon, calling your attention to a possibly risky situation
CAUTION
Before folding seats all the way down, ensure the seat belt is unbuckled and there are no objects remaining on the seat.
Warning IconA warning icon, calling your attention to a possibly risky situation
Warning
Always ensure the seat backs are locked in their upright position by pushing it forward or rearward. Failure to do so increases the risk of injury.

Moving Second Row Seats (7-seater only)

Lift the bar located beneath each outboard seating position to unlock and move the second row seats forward or rearward. The bench seats have a 60/40 split. Therefore, the bar on the left side moves the seat for the left and center seats, whereas the bar on the right side moves only the rightmost seat. Pull up and hold the bar while moving the seat forward or rearward. Release the lever when the seat is at the desired location. Push the seat rearward and forward to ensure the seat(s) are locked into position.

Second row seats with an arrow pointing up (pull) from seat bar, another arrow pointing forward (push)

Accessing Third Row Seats (7-seater only)

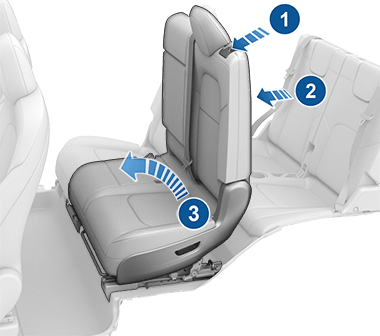
A third row ingress button is located on the backrest of each second row outside seat. This button makes it easy for passengers to access the third row seating positions. To access a third row seat:

  1. Press the button on the associated second row backrest.
    Informational PurposesAn informational icon, calling your attention
    Note
    If you press the button and do not move the seats, the seats relock.
  2. Push the second row backrest forward. The seat then releases and pitches upward.
  3. Push the seat fully forward.
Second row seat with 3 arrows pointing: 1) to the backrest button 2) to the backrest 3) from the seat cushion forward

To relock the seats, first push the seat rearward. You will hear the seat tracks lock. Then push the seat downward to engage the rear latches onto the floor striker. You will hear the latches lock. If the seat does not latch onto the floor, the touchscreen displays a warning indicating that the seat is not properly locked into position.
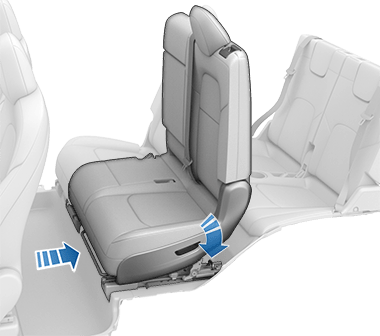
Second row seat with an arrow indicating to push it rearwards with another arrow indicating to push it down
Warning IconA warning icon, calling your attention to a possibly risky situation
Warning
Do not use the button when a child is seated in a seat that will move. Using the button moves the combined left and center seats forward and can squeeze the occupant. Use this button only when the second row seat is unoccupied. Before driving, ensure the seat and the seat back are securely latched into position.
Warning IconA warning icon, calling your attention to a possibly risky situation
Warning
Do not use a second row seating position when the seat is not securely latched into position,
Warning IconA warning icon, calling your attention to a possibly risky situation
Warning
After using the button to access the third row, push the second row seat backs into their upright position, ensuring that the seat backs are securely latched and "clicked" into position by trying to move them forward and rearward. Failure to do so increases the risk of injury.
Warning IconA warning icon, calling your attention to a possibly risky situation
Warning
Keep the area on the underside of the second row seats free of debris to ensure reliable locking of the floor latches.
Warning IconA warning icon, calling your attention to a possibly risky situation
Warning
If an occupant is seated in the the third row when pushing down on the second row seat to engage the floor latches, ensure that the occupant's feet are not located under the second row seat.

Folding Third Row Seat Backs (7-seater only)

To fold a third row seat, first ensure that the head support is fully down as shown (see Head Supports). Then press the button located in the top corner of the seat back and fold the backrest downward.

Third row seats with an arrow pointing to the button on the top corner and another arrow pointing down as the seat folds
Informational PurposesAn informational icon, calling your attention
Note
To return the seat backs to the upright position, pull the seat back upward until it latches into place. Try pulling the backrest forward to confirm that it is securely latched in the upright position.
Informational PurposesAn informational icon, calling your attention
Note
Before folding the seat backs, remove any items from the seats and the footwell. To allow the backrests to fold completely flat, you may need to move the second row seats forward.
Informational PurposesAn informational icon, calling your attention
Note
Driving with the third row backrests folded forward may result in increased perceivable noise and/or vibration coming from the rear of the vehicle (trunk, suspension, etc.).
Warning IconA warning icon, calling your attention to a possibly risky situation
CAUTION
Before folding seats all the way down, ensure the seat belt is unbuckled and there are no objects remaining on the seat.
Warning IconA warning icon, calling your attention to a possibly risky situation
Warning
Always ensure the seat backrests are locked in their upright position before travel. Failure to do so increases the risk of injury.

Head Supports

The front seats include integrated head supports that you cannot adjust.

The second row outboard seats include an adjustable head support that you can raise, lower, or remove. When either of these seats is occupied by a passenger that is not in a child safety seat, the corresponding head support should be adjusted (align the center of the head support with the center of the occupant's head) and locked into position. To raise a head support on a second row outboard seat, pull it upward to the desired position. To lower it, press and hold the button on the base of the outer post while pushing it downward.
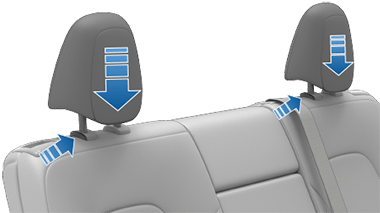
An arrow pointing to a button on theg head support base, with an arrow pointing down on the head support cushion

The second row center seat, and both third row seats (if equipped), are equipped with the option to raise a head support. Initially stowed into the seat's back rest, you can access the head support by pulling it upward.

Warning IconA warning icon, calling your attention to a possibly risky situation
Warning
When installing a child safety seat in a second row seating position, or in the third row (if equipped), you must lower the head support. The headrest must be raised and locked in place when sitting in the rear middle seat.

To stow the head support in the second row center seat, press and hold the button on the base of the post while pushing the head support fully downward.

An arrow pointing to a button on the head support base, with an arrow pointing down on the head support cushion

To lower a head support in the third row, press and hold the button on the base of the post while pushing the head support fully downward.

An arrow pointing to a button on the head support base, with an arrow pointing down on the head support cushion
Warning IconA warning icon, calling your attention to a possibly risky situation
Warning
To minimize the risk of severe injury or death in the event of a collision, ensure that head supports are positioned correctly before driving.

Removing/Installing a Head Support

All head supports in the second and third row (if equipped) seating positions can be removed. To remove a head support:

  1. Fully raise the head support by pulling it upward.
  2. Press and hold the button located at the base of one of the posts.
  3. Insert a short, flat object (such as a small flat-head screwdriver) into the opening in the base of the opposite post and pull the head support upward.
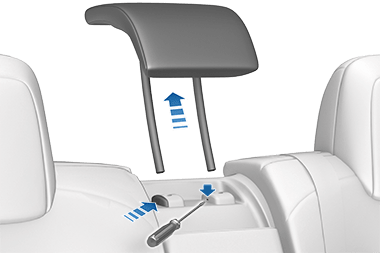
    An arrow pointing to a button on the head support base, a screwdriver positioned on the inside head support base, with an arrow pointing up on the head support cushion

To re-install the head support:

  1. With the front of the head support facing forward, insert both posts into the corresponding holes on the seat back.
  2. Press downward on the head support until it clicks into place.
  3. Pull upward on the head support to ensure that it is secure.
Warning IconA warning icon, calling your attention to a possibly risky situation
Warning
Ensure that the head support is correctly installed before seating an occupant. Failure to do so increases the risk of injury or death if a collision occurs.

Seat Heaters

The front and second row seats operate at three levels from 3 (highest) to 1 (lowest). To operate the seat heaters, see Operating Climate Controls.

Warning IconA warning icon, calling your attention to a possibly risky situation
Warning
To avoid burns resulting from prolonged use, individuals who have peripheral neuropathy, or whose capacity to feel pain is limited because of diabetes, age, neurological injury, or some other condition, should exercise caution when using the climate control system and seat heaters.

Seat Covers

Warning IconA warning icon, calling your attention to a possibly risky situation
Warning
Do not use seat covers on a front seat. Doing so could restrict deployment of the seat-mounted side airbags if a collision occurs. Also, if the vehicle is equipped with an occupant detection system that is used to determine the status of the passenger front airbag, seat covers may interfere with this system.